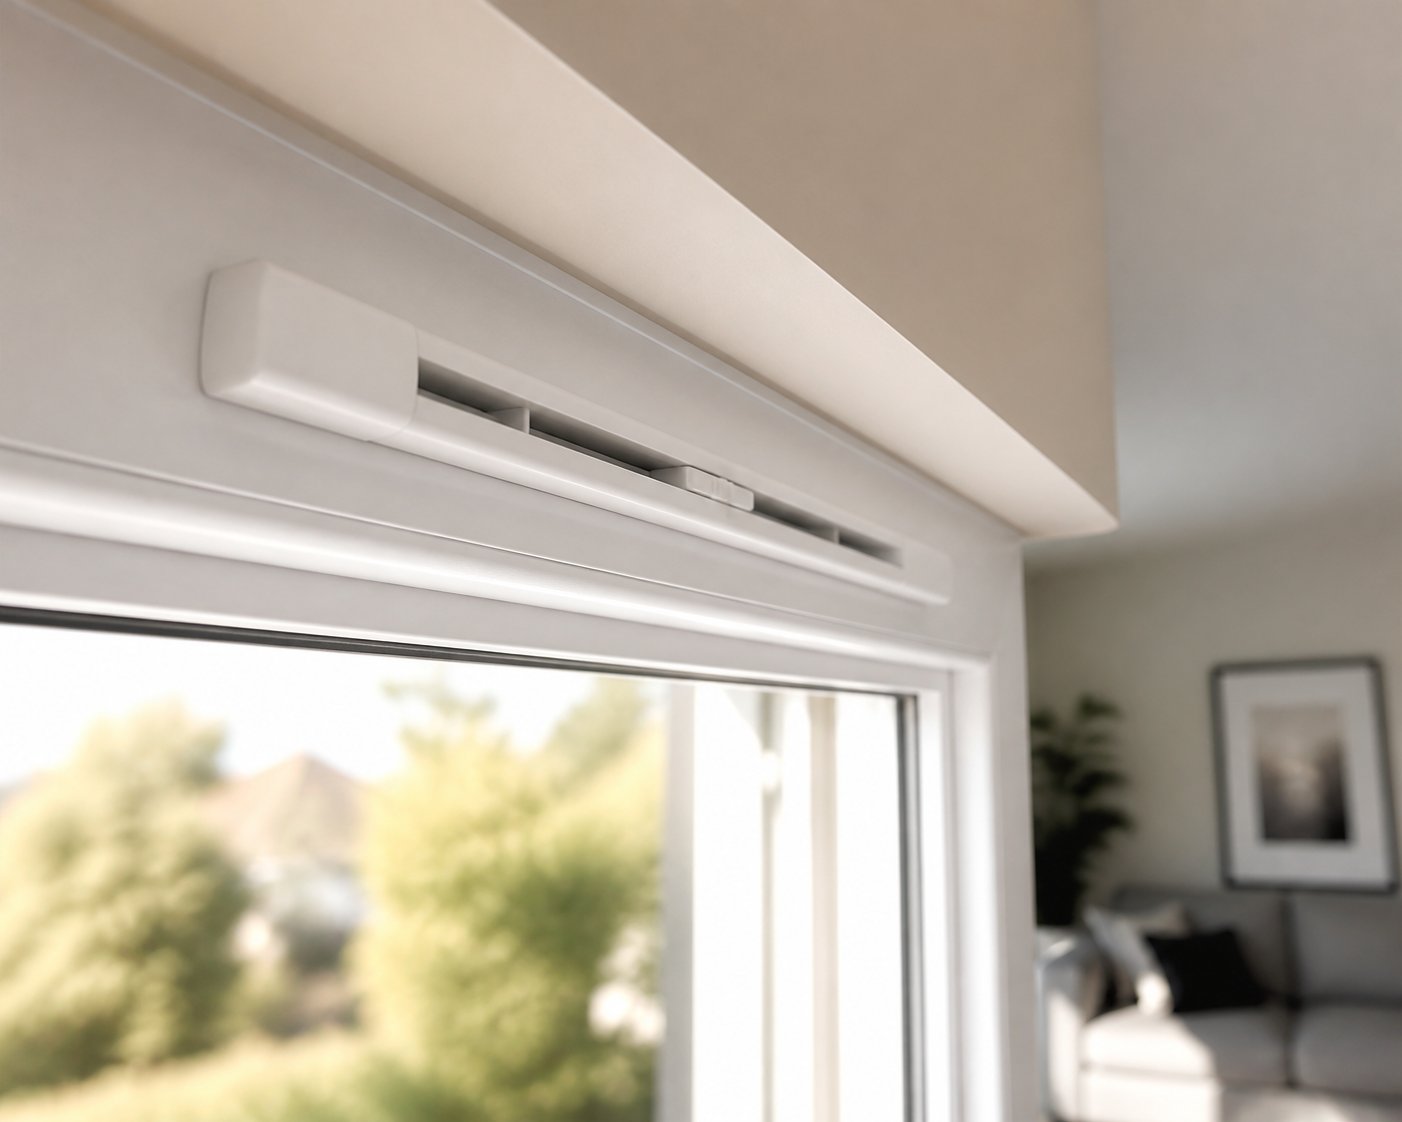
Imagine you have perfectly sealed double-glazed windows, yet your home feels stuffy and moisture streams down the glass every morning. You need fresh air, but replacing your windows is not on the table. This is exactly where a surface mounted trickle vent comes in — a small, unobtrusive ventilation device that fixes directly onto the interior face of your existing window frame, allowing a controlled flow of fresh air into the room while the window stays closed and locked.
Unlike other trickle vent types that must be integrated during window manufacture — routed into the frame profile or sandwiched between the glass unit and frame — the surface mounted variant is designed specifically for retrofit. It attaches to what you already have. That single distinction makes it the only trickle vent category that can be added to most existing uPVC, timber, or aluminium windows without removing or replacing the frame or glazing.
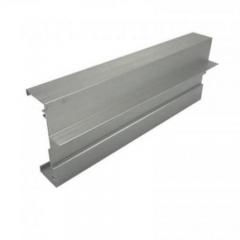
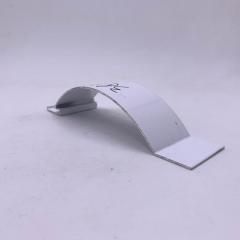
The physical design is straightforward. An internal canopy piece — typically a slim aluminium or UV-stabilised ABS housing — is screw-fixed to the room-facing surface of the window frame or sash. A series of small holes or a narrow slot is drilled through the frame to create an airflow path. On the outside, an external weather canopy covers the openings, shielding them from rain and wind while still permitting air to pass through. The occupant controls airflow by sliding or rotating the internal canopy open or closed with a single finger.
A surface mounted trickle vent is a background ventilation device fixed to the interior face of an existing window frame, using drilled slots and an external weather canopy to deliver controlled fresh airflow without opening the window or modifying the glazing unit.
Because the vent sits on the frame surface rather than inside a routed channel, installation does not require factory machinery or specialist glazing work. A competent DIYer or contractor with a drill, a template, and the correct bit sizes can complete the job in under an hour per window.
Three groups rely on these vents most often:
Throughout this guide, you will find everything needed to size, install, and select the right vent — from equivalent area ratings and building regulation compliance to step-by-step fitting instructions and acoustic performance considerations. The goal is simple: help you solve a ventilation problem without buying new windows.
Of course, understanding why people search for this specific solution in the first place reveals just how common — and how frustrating — the underlying ventilation problems really are.
Nobody wakes up one morning and decides to search for a trickle vent out of casual curiosity. Something specific is going wrong — streaming windows, a failed inspection letter, or traffic noise that makes sleeping impossible. Each of these frustrations points to the same underlying need: background ventilation for sealed double-glazed windows that does not require ripping out perfectly good frames.
Modern double- and triple-glazed windows are remarkably effective at keeping heat inside. The trade-off? They also trap moisture. Every shower, boiling kettle, and even every breath you take releases water vapour into the air. In older, draughtier homes, that moisture escaped through gaps around frames and seals. In today's airtight properties, it has nowhere to go.
You will notice the symptoms quickly. Water streams down glass panes each morning. Black mould creeps along window reveals and into corners. A musty, damp smell lingers no matter how often you clean. Left unchecked, these issues damage paintwork, degrade plaster, and — more importantly — pose genuine health risks for your family. A trickle vent for condensation on windows provides a simple escape route for that trapped moisture, restoring a gentle background airflow while the window stays shut and locked. It is one of the most practical ways to fix condensation without replacing windows entirely.
Here is a scenario that plays out far more often than it should. A homeowner invests in brand-new replacement windows, the installer finishes the job, and then a building control inspection flags a problem: no background ventilation has been fitted. A report from RISA found that over a quarter of inspection failures stem from non-compliance with Part F of the Building Regulations, which covers ventilation requirements. Signed disclaimers from homeowners opting out of trickle vents are explicitly not accepted as valid compliance — the work simply must meet the regulations.
For a homeowner or installer facing a trickle vent for a failed building control inspection, the options look bleak at first. Removing newly fitted windows to have vents integrated at the factory is expensive and wasteful. A surface mounted trickle vent sidesteps this entirely — it fixes to the existing frame face, delivers a tested airflow rating, and satisfies the inspector without a single pane of glass being disturbed.
Ventilation creates an obvious tension for properties near busy roads, railways, or flight paths. Opening a window for fresh air floods the room with noise. Keeping it shut traps stale, humid air inside. Standard trickle vents help with airflow, but they can also transmit external sound through the open air path — a problem that demands a more specialised solution. Acoustic trickle vent variants, which use internal baffles and sound-absorbing materials to attenuate noise while still permitting airflow, address this directly. We will explore acoustic performance in detail later in this guide.
In short, the three core problems driving people toward this retrofit solution are closely related but distinct:
Each of these problems raises a practical follow-up question: how does a surface mounted option actually compare to other trickle vent types, and when is it genuinely the best choice? The differences are more significant than most people expect.
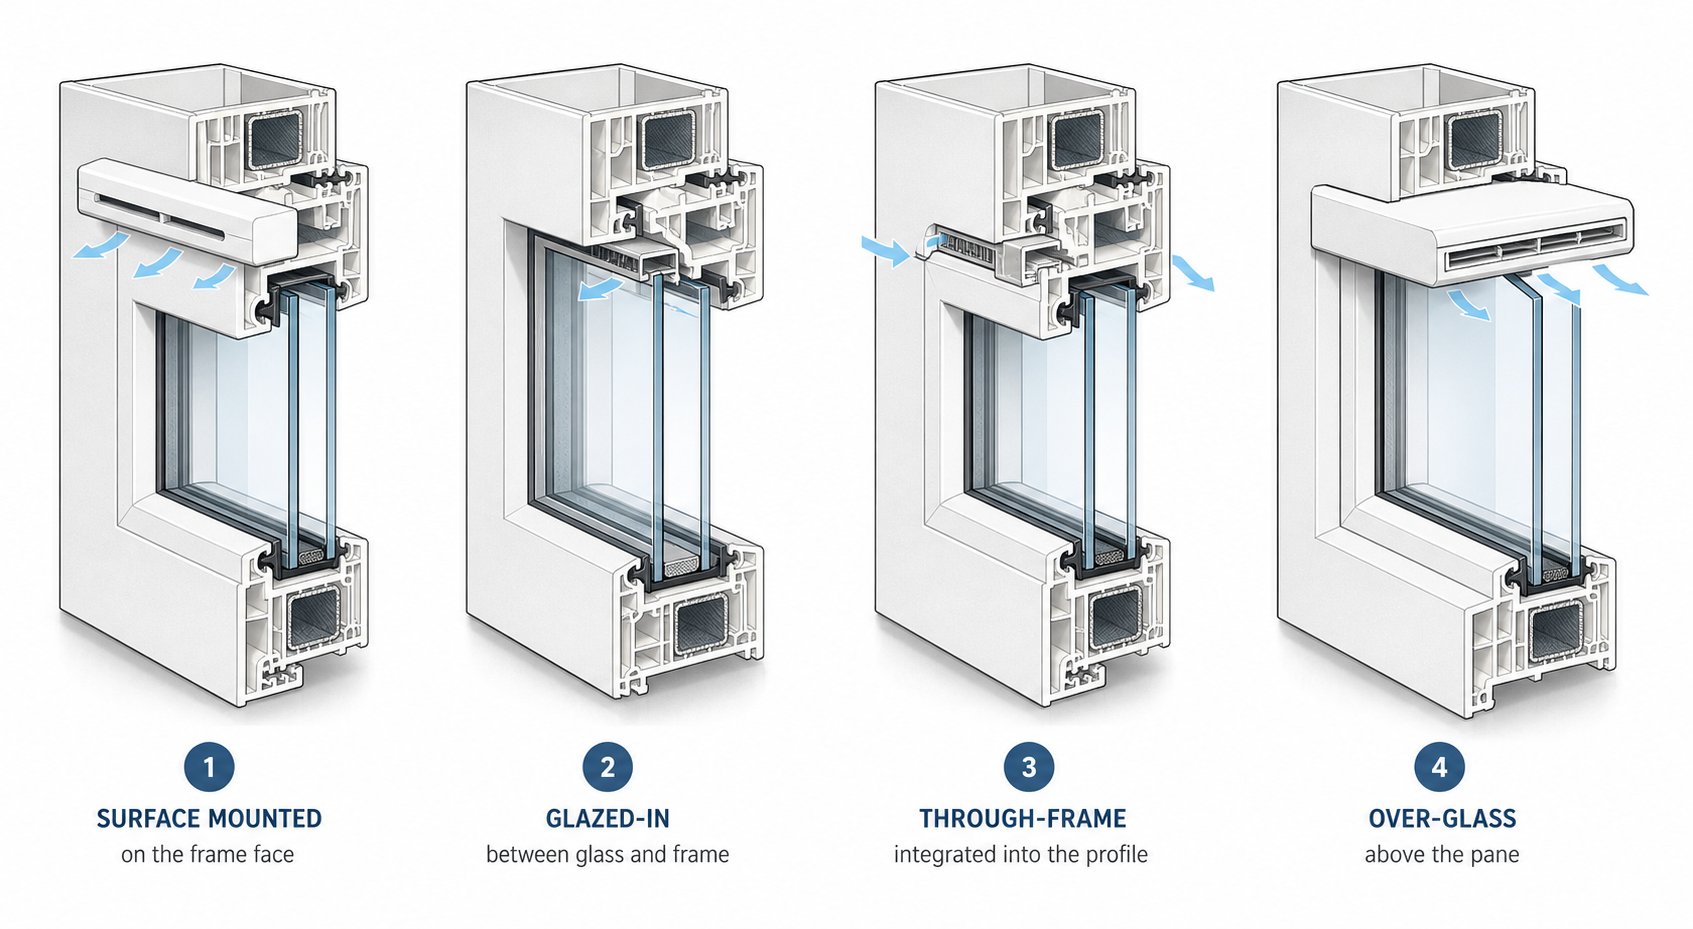
Not all trickle vents are created equal, and the differences go far beyond appearance. Four distinct mounting methods exist, each engineered for a specific installation context. Understanding how they work — and more importantly, where each one falls short — is what separates a confident specification from an expensive mistake. If you are working with existing windows, this comparison will make your decision very clear.
Surface mounted (over-frame) vents are self-contained units fixed directly onto the room-facing surface of an existing window frame or sash. A series of holes or a narrow slot is drilled through the frame material, and an external weather canopy covers the outside openings. The entire assembly sits proud of the frame profile — visible, but slim enough to be unobtrusive. Because nothing needs to be routed into the frame during manufacture, this is the type that lends itself to retrofit.
Glazed-in vents take a completely different approach. Instead of attaching to the frame, they are sandwiched between the sealed glass unit and the frame rebate. The vent body replaces a strip of the glazing spacer bar at the top of the unit, allowing air to pass through without penetrating the frame itself. It is a clever, discreet design — but the glass unit must be specifically manufactured or replaced to accommodate it. As installation specialists at Colin's Sash Windows note, this method is particularly useful where there genuinely is not enough room in the frame for a surface-fixed vent, though it does require reglazing.
Through-frame (frame-integrated) vents are machined directly into the window profile during factory production. The ventilation channel is part of the extrusion itself, making the vent virtually invisible once installed. This is the premium option for new-build projects and bespoke window orders, but it simply cannot be added to a window that has already left the factory.
Over-glass vents mount above the glass pane within the frame rebate, sitting in the narrow gap between the top of the glazing unit and the frame. They redirect air over the glass surface before it enters the room. Like glazed-in variants, they typically require the sealed unit to be removed and refitted with a slightly smaller pane to create the necessary clearance.
Seeing these four types side by side makes the practical differences impossible to miss. The table below compares them across the criteria that matter most when you are choosing between them for a real project.
| Criteria | Surface Mounted | Glazed-In | Through-Frame | Over-Glass |
|---|---|---|---|---|
| Retrofit Suitability | Excellent — fits most existing frames without factory work | Moderate — requires new or replacement sealed unit | None — must be specified at manufacture | Limited — sealed unit must be resized or replaced |
| Window Materials Supported | uPVC, timber, aluminium | uPVC, timber, aluminium | uPVC, aluminium (profile-dependent) | Primarily uPVC and timber |
| Typical EA Range | 2,500 – 5,000 mm² | 2,500 – 5,000 mm² | 2,500 – 5,000 mm² | 2,500 – 4,000 mm² |
| Visual Impact | Visible on frame face; slim modern profiles reduce prominence | Very low — concealed within the glazing rebate | Minimal — integrated into the frame profile | Low — sits within the frame rebate above the glass |
| Relative Cost | Low — vent unit plus basic drilling | Medium — includes cost of new sealed unit | Included in window price at manufacture | Medium — reglazing and vent unit combined |
| Ease of DIY Installation | High — drill, template, and screwdriver | Low — professional glazing required | Not applicable — factory only | Low — professional reglazing required |
Key takeaway from this comparison: the surface mounted type is the only option suitable for retrofitting to most existing window frames without factory modification or reglazing. Every other method either demands a new sealed unit, a purpose-built frame profile, or both. For homeowners and contractors working with windows that are already installed, the decision often makes itself.
The decision logic is surprisingly straightforward once you strip away the jargon. Choose a surface mounted trickle vent when any of the following apply:
Glazed-in vents earn their place when frame space genuinely cannot accommodate a surface-fixed unit — for instance, on slender aluminium profiles or heritage timber sashes where aesthetics are paramount. Through-frame vents remain the ideal choice for new-build specifications where ventilation can be planned from day one. And over-glass variants fill a niche for specific frame geometries that rule out the other three options.
But for the vast majority of retrofit projects — uPVC replacements missing their vents, older timber windows in need of background airflow, or aluminium frames that were delivered without ventilation — the surface mounted route offers the best balance of cost, speed, and regulatory compliance.
Choosing the right type, however, is only half the equation. The other half is choosing the right size, and that means understanding a metric most homeowners have never encountered: equivalent area.
Every surface mounted trickle vent you will come across carries a number measured in square millimetres — its equivalent area, or EA. Pick a vent with the wrong EA and you either under-ventilate the room (risking condensation and a failed inspection) or over-specify and spend more than necessary. Getting this number right is the single most important step in the selection process, yet it is the one detail most guides gloss over entirely.
Sounds technical? It is actually a simple concept. Equivalent area is a standardised measure of how much free airflow a trickle vent can deliver, expressed in mm². Think of it as the vent's breathing capacity. Crucially, EA is not the physical size of the slot you see on the frame. A vent with a 400 mm long opening might deliver a very different EA than another vent of the same length, because the internal baffles, filters, and air-path geometry all create resistance that reduces effective airflow. The EA figure you see on a product datasheet comes from laboratory testing under controlled conditions, giving you a reliable, apples-to-apples comparison between products regardless of their physical dimensions.
So, what equivalent area do you need for a trickle vent in your home? The answer depends on the room type and the dwelling's overall ventilation strategy. In England and Wales, Approved Document F sets minimum background ventilation values, and these are divided by room function. Guidance for naturally ventilated dwellings typically specifies minimum EA values along these lines:
| Room Type | Typical Minimum EA Requirement | Notes |
|---|---|---|
| Living Room | 8,000 mm² | Habitable rooms generally share the same baseline requirement |
| Bedroom | 8,000 mm² | Each bedroom is treated as an individual habitable room |
| Kitchen | 8,000 mm² | May increase depending on dwelling type and floor area |
| Bathroom / WC | 4,000 mm² | Lower requirement reflects smaller room size and supplementary extract ventilation |
| Utility / Wet Room | 4,000 – 5,000 mm² | Varies by regulation and dwelling configuration |
These figures represent general guidance ranges drawn from regulatory documentation. Your building control officer or the vent manufacturer's datasheet will confirm the exact values applicable to your specific project, especially since dwelling type, floor area, and the number of bedrooms can all influence the total background ventilation requirement. Scotland and Northern Ireland follow equivalent but separately titled regulations, so always check the guidance that applies to your location.
A practical tip: the total EA requirement for a room does not have to come from a single vent. If a window frame is too narrow for one large unit, two smaller vents with combined EA values that meet the target will satisfy compliance just as effectively.
Here is where many DIY installers and even some contractors trip up. Surface mounted trickle vents come in a range of standard lengths — commonly 260 mm, 400 mm, and 500 mm — and each length corresponds to a specific tested EA rating. The temptation is to simply pick the longest vent that physically fits the frame head. That approach ignores the only number that actually matters.
To calculate trickle vent size for a room correctly, start with the room's regulatory EA requirement from the table above. Then match that figure to a vent — or combination of vents — whose tested EA meets or exceeds it. A 400 mm vent from one manufacturer might deliver 3,200 mm² EA, while a 400 mm vent from another delivers 4,000 mm² EA, simply because internal baffle design differs. Always check the tested EA on the product's technical data, not the physical length alone.
This sizing discipline becomes even more critical when the vent also needs to meet acoustic performance standards — a situation that introduces a second set of tested ratings into the specification process.

Knowing the correct EA for a room is only useful if you understand when the law actually requires you to fit background ventilation in the first place. Building regulations around trickle vents trip up homeowners and installers alike — partly because the rules tightened significantly in recent years, and partly because persistent myths about exemptions continue to circulate. This section cuts through the confusion in plain language so you can determine whether your project triggers a compliance requirement and, if it does, how a surface mounted trickle vent satisfies it without replacing a single window.
Three main scenarios trigger a legal requirement for background ventilation under the Building Regulations in England and Wales:
1. New-build construction. Every new dwelling must be designed with a full ventilation strategy covering background ventilation (trickle vents), extract ventilation (fans in wet rooms), and purge ventilation (openable windows or doors). Trickle vents are the standard method for delivering the background component in naturally ventilated homes.
2. Replacement windows installed under a FENSA or CERTASS scheme. This is where the biggest misconception lives. Many homeowners — and some installers — believe that if the old windows had no trickle vents, the new ones do not need them either. The 2021 edition of Approved Document F, in force since June 2022, tightened the rules considerably. The governing principle is now that replacement windows must not make a dwelling's background ventilation worse than it was, and must provide adequate background ventilation. In practice, this means trickle vents are required on the vast majority of replacement window jobs — whether or not the originals had them. Treating them as optional on a FENSA or CERTASS-certified installation is a compliance risk the installer cannot sign away, even with a written customer disclaimer.
3. Extensions and conversions. Adding a new habitable room — whether through a rear extension, loft conversion, or garage conversion — triggers a requirement for ventilation designed as new provision. Each new room needs its own background ventilation, and the surface mounted route is frequently the fastest way to deliver it when windows are already fitted before the ventilation design is finalised.
A common question deserves a direct answer: do replacement windows need trickle vents by law? Under the current regulations in England, yes — in the great majority of cases. Where the old windows already included vents, the replacements must provide at least the same equivalent area. Where the old ones did not, the practical effect of the 2021 update is that adequate background ventilation should still be fitted. Scotland follows its own Building Standards Technical Handbook (Section 3: Environment), and Northern Ireland uses Technical Booklet K — both set equivalent ventilation requirements under their own regulatory frameworks.
Approved Document F does not prescribe a specific vent type. What it prescribes is a minimum background ventilation capacity, expressed as equivalent area in mm², for each room or dwelling. Any controllable ventilator that delivers the required EA — tested to BS EN 13141-1 — can satisfy the requirement. This is precisely why the surface mounted option works so well as a retrofit solution.
Imagine you have just had new uPVC windows installed across your home, only to discover that no background ventilation was included. The regulation does not demand that you tear those windows out and order new frames with integrated vents. It demands that each room achieves its required EA through a controllable, weatherproof background ventilator. A surface mounted trickle vent drilled and fixed onto the existing frame head, with a tested EA value that meets the room's threshold, checks every regulatory box.
Two conditions must be met for the vent to qualify:
This flexibility is what makes the surface mounted approach so valuable for retrospective compliance. It lets homeowners and contractors resolve ventilation shortfalls on windows that are already installed, glazed, and sealed — without any factory intervention.
If your project requires a building control inspection — or if a previous inspection flagged a ventilation failure — knowing exactly what the inspector looks for removes the guesswork. The checklist is shorter than most people expect:
Here is the reassuring part for anyone holding a failed inspection letter: fitting surface mounted vents after the windows are installed can resolve a non-compliance finding without removing or replacing the window unit. The inspector simply needs to see that the vents are present, correctly sized, controllable, and weatherproof. Because the surface mounted type requires only drilled holes, an internal canopy, and an external weather shield — all attached to the existing frame — the remediation work is typically completed in a single visit.
FENSA and CERTASS registered installers bear direct responsibility for this compliance. The self-certification process means the installer — not the homeowner — must ensure Part F requirements are met before issuing a certificate. A missing or undersized vent is a compliance failure that frequently surfaces during property conveyancing, when solicitors check the FENSA certificate against regulatory standards. Keeping manufacturer datasheets showing the tested EA for each vent fitted is the simplest way to demonstrate compliance if questions arise months or years later.
Regulatory compliance sets the minimum standard, but getting the physical installation right is what determines whether your vents actually perform as tested. The difference between a properly fitted vent and one that leaks, rattles, or underperforms often comes down to a handful of practical steps during drilling and mounting.
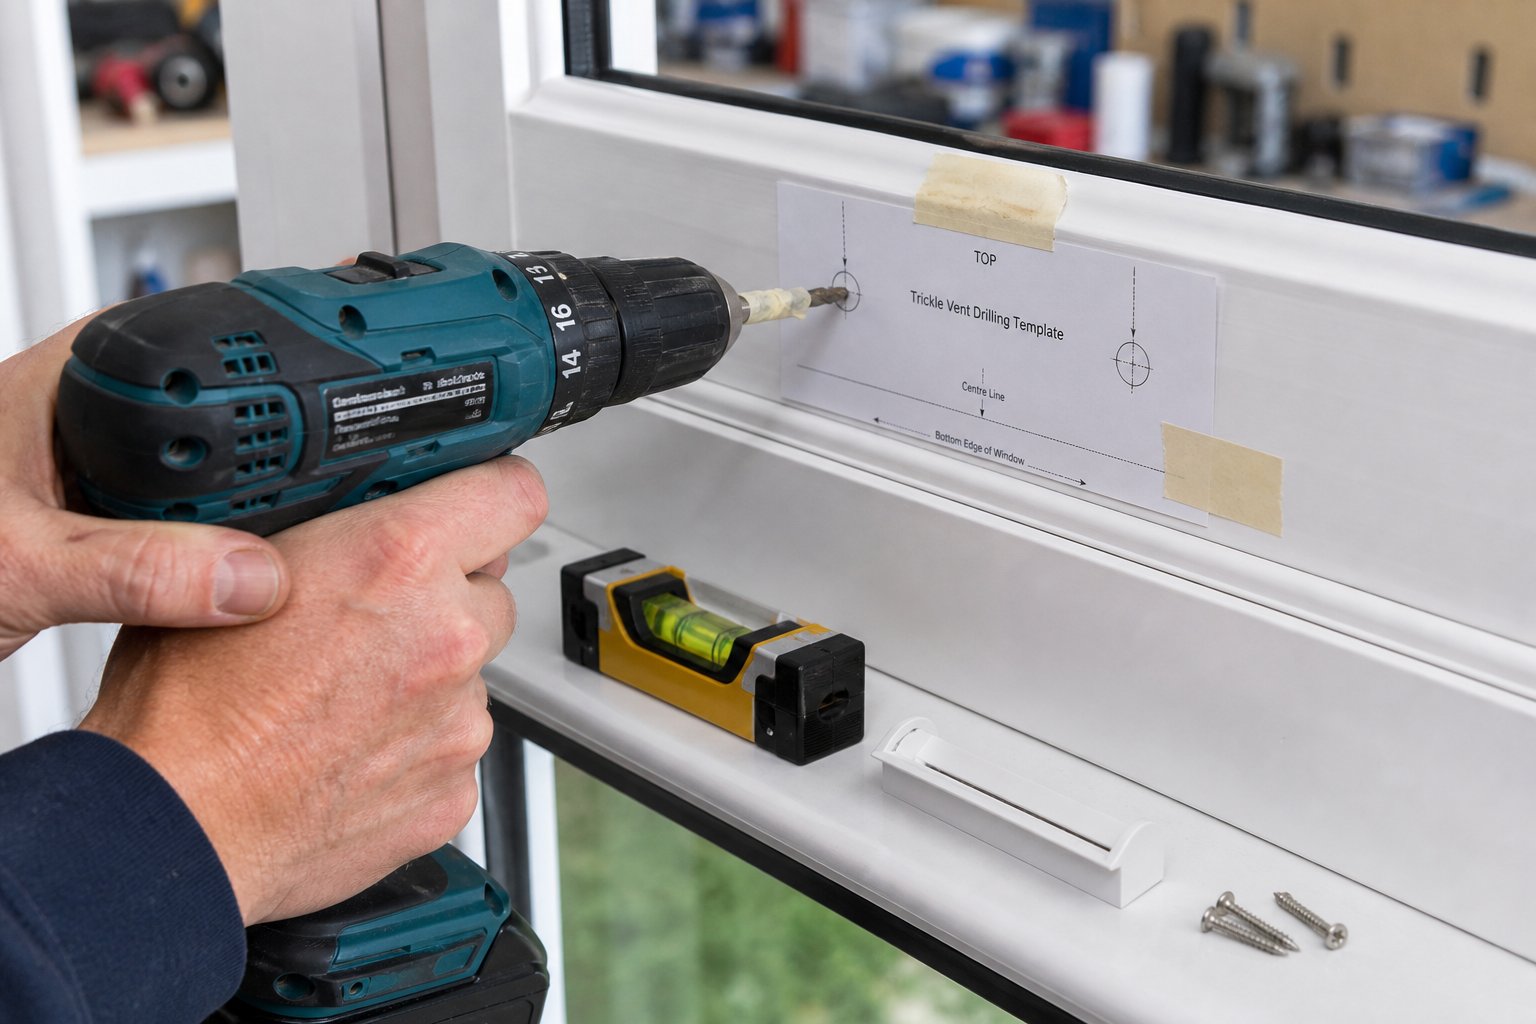
You have identified the right vent, confirmed the EA requirement for the room, and verified that the regulations apply to your project. The next question is practical: how do you actually fit a surface mounted trickle vent to an existing window frame without damaging it? The process is more straightforward than most people expect, but a few critical details separate a clean, weatherproof installation from one that leaks, rattles, or fails an inspection. This surface mounted trickle vent installation guide walks through every stage — from gathering tools to the final function check.
Before touching the window frame, gather everything in one place. Pausing mid-drill to hunt for a spirit level or the right bit size is how alignment errors happen. Here is what you will need:
One more item worth having on hand: a small magnet. You will see why in the next step.
This preparation stage is where most DIY installation problems are either prevented or created. Rushing straight to drilling — tempting as it is — skips the checks that protect your frame, your glass, and your sanity.
Check the frame depth. You need enough solid material to drill through without the bit punching into the sealed glazing unit on the other side. On most uPVC window frames, the head section (the horizontal top rail) offers between 50 mm and 70 mm of depth, which is more than enough. Timber frames vary more widely — measure carefully from the room-facing surface to the nearest edge of the glass unit, and confirm you have sufficient clearance for the hole depth specified in the vent instructions.
Locate steel reinforcement in uPVC frames. This is where that magnet earns its place. Most uPVC profiles contain galvanised steel reinforcement bars for structural rigidity. Running a magnet along the frame head reveals exactly where the steel sits. You will need to drill through it — it is unavoidable — but knowing its position in advance lets you use the correct HSS bit and avoid nasty surprises. As installation specialists at SMS Recycling emphasise, using a specialised uPVC drill bit designed for cutting through both the plastic and the reinforced metal plate is essential for a clean result.
Mark the drilling positions. Use the paper template supplied with the vent — or hold the vent body itself against the frame head — and mark each hole centre with a pencil. Align the template centrally along the frame width and check it with a spirit level. Mark corresponding positions on the external side of the frame as well. Both sets of marks must line up, so take your time and measure twice.
Check for obstructions. Before committing to drill positions, verify that no drainage channels or weep holes in the frame will be blocked by the vent. uPVC frames have built-in drainage paths that channel rainwater out through the bottom rail — positioning a vent too close to an internal drainage cavity can divert water where it should not go. Also confirm there are no cable runs (occasionally found in frames fitted with integral blinds or window sensors) in the drill path.
With everything marked and checked, the physical installation follows a logical sequence. Here are the steps to retrofit a trickle vent to an existing uPVC window — or timber or aluminium frame — in the correct order:
The entire drilling and fitting process typically takes between 30 minutes and an hour per window, depending on frame material and your confidence with the drill. Timber frames cut the fastest; uPVC with heavy steel reinforcement takes a little more patience.
A fitted vent is not a finished job until you have confirmed three things:
Open and close test. Slide or rotate the internal canopy's control mechanism through its full range. The vent should move smoothly between fully open and fully closed without sticking, scraping, or requiring force. If it binds, a screw may be slightly overtightened or the housing may be sitting on a burr — loosen, inspect, and re-fix.
Daylight check. Stand inside the room with the vent in the closed position and look carefully at the edges of the internal housing. No daylight should be visible around the canopy's perimeter. Visible light gaps indicate the housing is not seated flush against the frame — often caused by a stray piece of swarf, an uneven sealant bead, or a frame surface that was not cleaned before fitting.
External drainage verification. From outside, confirm that the weather canopy's drainage path is unobstructed. Many external canopies feature a small lip or angled profile that directs any wind-driven rain downward and away from the drilled openings. Pour a small amount of water over the canopy to simulate rainfall and watch where it travels. Water should run cleanly off the canopy and down the frame face — not pooling behind the housing or seeping into the drilled slots.
Once all three checks pass, the installation is complete and the vent is ready for daily use. Clean any remaining pencil marks from the frame, and keep the manufacturer's datasheet somewhere accessible — you may need it later to demonstrate the vent's tested EA rating during a building control inspection or property sale.
A clean installation delivers reliable performance for years. A careless one, on the other hand, introduces problems that are easy to avoid but surprisingly common — from water leaks caused by a missing external canopy to EA shortfalls from choosing the wrong vent size. Knowing these pitfalls in advance saves time, money, and frustration.
Every step in the installation guide above has a corresponding way to get it wrong — and the consequences range from a minor annoyance to a failed building control inspection or water damage inside the frame cavity. The frustrating part? Nearly every mistake is preventable with a little foreknowledge. Here are the pitfalls that catch DIY installers and even some professionals off guard, along with practical ways to sidestep each one.
This is the single most common error, and it happens because the logic feels backward. You measure the frame head, find a vent that physically fits, and assume the job is done. The problem? Physical length and tested equivalent area are two entirely different things. A 400 mm vent from one manufacturer might deliver 3,200 mm² EA, while a 400 mm vent from another delivers 4,000 mm² EA. Choose based on length alone and you risk installing a vent that looks correct but delivers insufficient airflow for the room's regulatory requirement.
The result is under-ventilation that may pass a visual check but fail a building control inspection when the officer reviews the manufacturer's datasheet. Worse, the room continues to suffer from condensation and poor air quality despite having a vent visibly fitted. Always start with the room's minimum EA threshold — 8,000 mm² for habitable rooms or 4,000 mm² for bathrooms in a typical multi-storey dwelling — and work backward to select a vent (or combination of vents) whose tested EA meets that number.
Can you drill into a uPVC frame for a trickle vent? Yes — but the frame contains hidden obstacles that demand respect. Most uPVC window profiles include galvanised steel reinforcement bars inside the hollow chambers. These bars give the frame its structural rigidity, and drilling into one without warning can jam the bit, crack the surrounding plastic, or send the drill lurching sideways into the glass.
Before marking any drill points, run a magnet along the inside of the frame head. The magnet will stick where steel is present, giving you a clear map of the reinforcement layout. Where possible, position your drill holes in sections of unreinforced plastic. If the vent template requires you to drill through steel — and on many frames, it will — switch to a high-speed steel (HSS) drill bit, reduce your drilling speed, and apply steady, moderate pressure. As Camberley Glass advises, using a wood bit on a steel-reinforced uPVC frame simply will not work and risks damaging both the bit and the frame.
An equally dangerous mistake is drilling too deep and puncturing the sealed glazing unit. This is easier to do than you might think, especially on slimmer frame profiles. Wrapping masking tape around the drill bit at the manufacturer's specified depth creates a visual stop that prevents you from plunging through the frame and cracking the glass seal.
Trickle vent rain water ingress problems almost always trace back to one of two causes: a missing external weather canopy, or a vent positioned directly over the frame's built-in drainage slots.
The external canopy is not a cosmetic trim piece — it is the vent's first line of defence against wind-driven rain. Omitting it, or fitting it loosely with gaps along the top edge, allows water to enter the drilled holes and run down the inside of the frame. Over time, this moisture pools in the frame's internal chambers, promotes mould growth you cannot see, and in timber frames, accelerates rot from the inside out.
The second drainage issue is subtler but just as damaging. uPVC window frames contain factory-moulded drainage channels that direct rainwater from the frame's rebate area down to weep holes in the bottom rail. If you position a surface mounted vent directly over one of these internal channels — or allow sealant to block the channel during fitting — water that should drain harmlessly to the outside instead backs up inside the frame. You may not notice the problem for months, until water stains appear on the window cill or the plasterwork beneath. Before finalising your drill positions, inspect the frame head for any internal drainage cavities and keep the vent well clear.
Should you seal trickle vents shut? The temptation is understandable — especially on a cold, windy evening when you feel a draught near the window head, or when road noise seems louder with the vent open. Some homeowners go further and remove the vent entirely, fitting a blanking plate or simply taping over the opening.
Blanking plates have a legitimate purpose: they close off unused vent slots on frames where a vent opening was cut but is no longer needed — for example, when a room layout changes and ventilation is relocated to a different window. However, using a blanking plate to permanently seal a vent that is required for regulatory compliance defeats the reason it was installed. Building control expects every required vent to be controllable — openable and closable — not sealed off. A permanently sealed vent is functionally the same as no vent at all.
Beyond compliance, sealing vents undermines the indoor air quality they are designed to protect. As VENTI Group notes, user closure to prevent draughts is one of the most common causes of trickle vent failure in UK homes, leading directly to condensation, mould growth, and the very air quality problems the vent was supposed to solve. If draught or noise is the concern, the answer is not to seal the vent — it is to upgrade to an acoustic-rated model that attenuates sound while maintaining airflow, or to check whether the vent is fitted correctly and sealing around its edges rather than through its controlled opening.
Here is a quick-reference checklist of all the mistakes covered above — worth reviewing before you pick up a drill:
Avoiding these pitfalls leaves you with a properly fitted, fully functional vent — but one performance dimension remains that no amount of careful drilling can address on its own. For properties exposed to significant external noise, the vent's acoustic rating determines whether fresh air comes at the cost of peaceful sleep or quiet concentration.
A standard surface mounted trickle vent does exactly what it promises — it lets air in. The problem is that air is not the only thing travelling through that open channel. Sound waves follow the same path, and for anyone living within earshot of a busy road, a railway line, or a flight corridor, that gentle trickle of fresh air can arrive with an unwelcome soundtrack. Acoustic trickle vents exist specifically to break this trade-off, but understanding how they work — and how their performance is measured — is essential before you specify one.
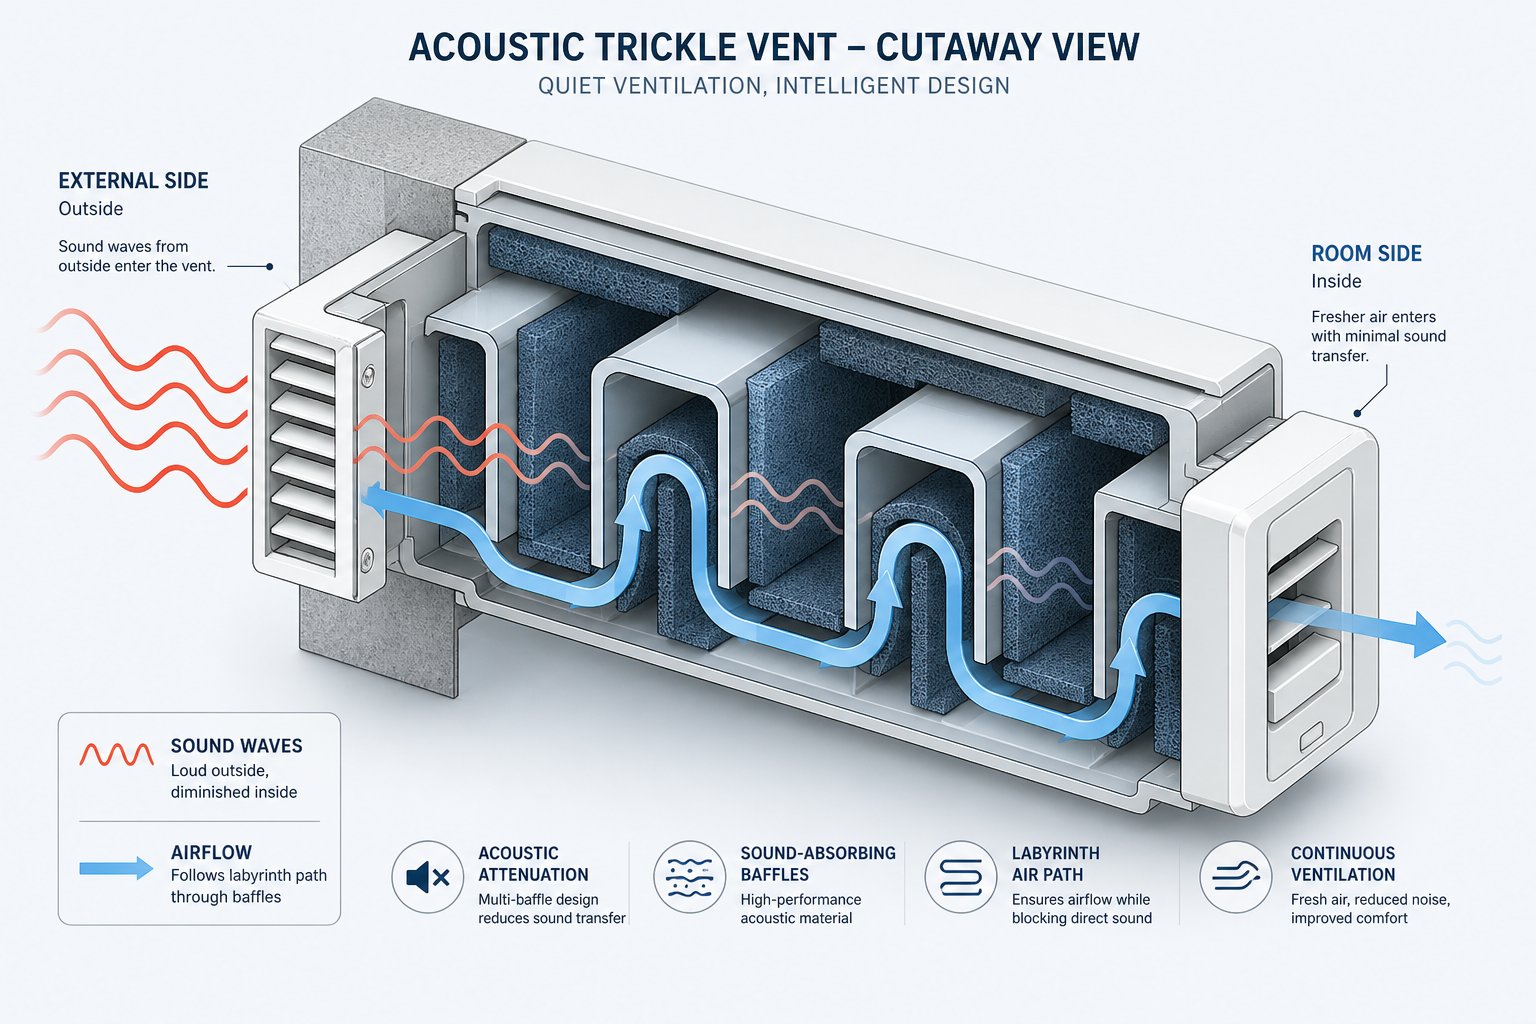
Picture a standard trickle vent in cross-section. You will see a relatively straight air path: air enters through the external canopy, passes through the drilled slots in the frame, and exits through the internal housing into the room. That direct route is efficient for airflow but equally efficient at transmitting noise. Every decibel of traffic rumble, train clatter, or aircraft roar outside has a near-unobstructed passage indoors.
Acoustic variants redesign that internal journey. Instead of a straight channel, they force incoming air through a labyrinth — a series of turns, chambers, and baffles lined with sound-absorbing materials. These materials disrupt and dampen sound waves as they travel through the vent, stripping energy from the noise before it reaches the room. Some designs use a dual attenuator system, pairing a sound-attenuating internal ventilator with a specially engineered external canopy to maximise noise reduction at both entry and exit points. The air still gets through; the noise does not — or at least, far less of it does.
The key metric for quantifying this noise reduction is the element-normalised level difference, weighted, written as Dn,e,w and measured in decibels (dB). This single-number rating tells you how many decibels of noise the vent strips out across a standardised range of frequencies — typically 100 Hz to 5,000 Hz — under controlled laboratory conditions following the BS EN ISO 10140-2:2021 testing framework. A higher Dn,e,w value means better sound insulation. For example, a vent rated at Dn,e,w 44 dB will block noticeably more noise than one rated at 35 dB. To put this in practical terms, testing data from independent acoustic laboratories shows that well-designed acoustic vents can achieve ratings above 50 dB — a level of attenuation that significantly improves indoor comfort even in high-noise environments.
You may also encounter C and Ctr spectrum adaptation terms alongside the Dn,e,w figure. These adjustment values refine the rating for specific noise types. The C term accounts for general broadband noise (think aircraft or loud music), while the Ctr term adjusts for lower-frequency, traffic-dominated noise. A datasheet entry reading Dn,e,w 44 (-1; -3) dB means the vent scores 43 dB against broadband noise and 41 dB against traffic-heavy noise — small but meaningful differences when you are targeting a specific noise source.
Not every project needs acoustic-rated ventilation. Standard vents are perfectly adequate for properties in quiet suburban or rural settings. Acoustic specification becomes essential — and in some cases legally mandated — when external noise levels cross specific thresholds.
The most common scenarios include:
It is also worth noting that Approved Document E — the building regulation governing resistance to the passage of sound — sets minimum sound insulation standards for separating walls and floors in new dwellings, conversions, and rooms for residential purposes. While Document E focuses primarily on structure-borne sound between dwellings, local planning authorities increasingly extend acoustic requirements to ventilation openings as part of overall noise mitigation strategies for developments in exposed locations.
Here is the engineering reality that every specifier needs to confront: acoustic attenuation and airflow compete for space inside the same vent body. The baffles, linings, and labyrinth paths that attenuate sound also create resistance to air movement. For a given vent length, an acoustic model will almost always deliver a lower equivalent area (EA) than a standard model — simply because some of the internal volume is occupied by sound-absorbing material rather than open air channel.
This means you cannot simply swap a standard vent for an acoustic one of the same physical size and assume the ventilation requirement is still met. A standard 400 mm vent might provide 4,000 mm² EA, while the acoustic variant of the same length might deliver only 2,500 mm² EA. If the room needs 8,000 mm² of background ventilation, two standard vents would suffice — but you might need three or four acoustic units to achieve the same total EA, or a longer acoustic vent if the frame accommodates it.
The practical solution is to check both ratings — EA and Dn,e,w — on the same product datasheet before committing to a specification. Manufacturers such as Shengxin Aluminium publish both airflow EA and sound-reduction data for their surface mounted window trickle vent range across uPVC, timber, and aluminium frames, enabling architects and contractors to verify compliance with ventilation and acoustic requirements from a single product datasheet rather than cross-referencing separate documents.
Always verify that an acoustic-rated trickle vent meets both the required equivalent area for ventilation compliance and the Dn,e,w rating for noise reduction — specifying one without checking the other risks failing either building control or the acoustic conditions attached to planning consent.
When reviewing manufacturer data, pay attention to performance in both open and closed positions. A vent's Dn,e,w rating typically differs significantly between states — closed-position ratings will be higher because the internal slider adds an extra barrier. The open-position rating is the figure that matters most for specification purposes, because that is how the vent will perform during normal use when ventilation is actively required.
Also look beyond the single-number Dn,e,w and examine the frequency response chart if the manufacturer provides one. A vent that performs well at mid and high frequencies (voices, tyre noise) may be weaker at low frequencies (heavy diesel engines, bass from entertainment venues). Matching the vent's frequency attenuation profile to the dominant noise source at your site delivers the best real-world outcome — far more reliably than choosing a product based on its headline dB figure alone.
With both ventilation capacity and acoustic performance accounted for, the final step is pulling every selection criterion together — EA, sound rating, frame compatibility, weather resistance, and finish — into a single decision framework that helps you choose the right vent for your specific project.
You have the knowledge — EA ratings, regulatory triggers, acoustic metrics, installation techniques, and a clear list of mistakes to avoid. The challenge now is pulling all of it into a single, confident decision. Whether you are a homeowner comparing products online or a contractor assembling a specification for a multi-unit project, the same core criteria apply. This trickle vent selection guide for contractors and homeowners alike distills everything covered in this article into a practical framework you can use the moment you are ready to buy.
Every surface mounted trickle vent on the market can be evaluated against six measurable factors. The table below serves as a surface mounted trickle vent specification checklist — run through it before placing any order and you will catch the oversights that lead to returns, failed inspections, or underperformance.
| Criterion | What to Check | Why It Matters |
|---|---|---|
| EA Rating (mm²) | Laboratory-tested equivalent area on the manufacturer's datasheet — not the physical slot dimensions | Determines whether the vent meets Approved Document F minimum background ventilation for the room type |
| Acoustic Rating (Dn,e,w) | Sound reduction in dB, including C and Ctr spectrum adaptation terms if the site is near traffic or transport | Ensures compliance with BS 8233 indoor noise targets and any acoustic conditions attached to planning consent |
| Frame Material Compatibility | Confirm the vent is designed for your specific frame type — uPVC, timber, or aluminium — and fits the available head depth | An incompatible vent risks poor sealing, difficult fixing, or physical damage to the frame during installation |
| Canopy Weather Rating | External canopy design and material — UV-stabilised housing, drainage lip, resistance to wind-driven rain | Prevents water ingress through the drilled slots and protects the vent from degradation over years of exposure |
| Controllability | Internal slider or rotary mechanism that opens and closes smoothly across the full range | A regulatory requirement — building control officers check that the occupant can control the vent manually |
| Colour / Finish Options | Available colours, RAL matching, or paintable surfaces that blend with your frame and interior decor | Reduces visual impact and improves occupant acceptance — a vent that clashes aesthetically is more likely to be sealed shut |
Print this checklist or save it on your phone. When you are comparing two or three products side by side, scoring each one against these six criteria turns a subjective decision into an objective one.
Different projects weight these criteria differently. Here is how to prioritise based on the most common scenarios:
For architects, contractors, and window system suppliers working across these scenarios, Shengxin Aluminium's window trickle vent range offers tested airflow, acoustic, and weather-performance data across uPVC and aluminium systems, with custom project configurations available for larger specifications. Their product page directly addresses the sizing, compliance, and acoustic questions raised throughout this guide — a practical starting point for anyone ready to move from research to specification.
Regardless of project type, three checks are non-negotiable every time you choose a surface mounted trickle vent:
Correct sizing and independently tested performance data matter more than price alone — a cheaper vent that underperforms costs far more in remediation, failed inspections, and condensation damage than a properly specified one ever will.
How to choose a trickle vent for uPVC windows — or timber, or aluminium — ultimately comes down to matching verified product data to your room's regulatory and environmental demands. Follow the specification checklist, avoid the common installation mistakes outlined earlier, and select a product backed by transparent test results. Do that, and your surface mounted trickle vent will deliver years of quiet, controlled background ventilation without a single window needing to be replaced.
Yes — a surface mounted trickle vent is specifically designed for retrofit. It fixes directly onto the room-facing surface of your current uPVC, timber, or aluminium window frame. A series of holes or a narrow slot is drilled through the frame head, and an external weather canopy is attached on the outside. The entire process typically takes under an hour per window using a drill, the manufacturer's template, and basic hand tools. No glass removal or factory modification is needed, making it the only trickle vent type that works on most already-installed windows.
Equivalent area requirements depend on room type and dwelling configuration as set out in Approved Document F. As a general guide, habitable rooms such as living rooms, bedrooms, and kitchens typically require a minimum of 8,000 mm² EA, while bathrooms and wet rooms usually need around 4,000 mm². The total EA for a room can come from multiple vents if a single unit does not fit the frame. Always confirm the exact figure with your building control officer or the vent manufacturer's datasheet, since factors like dwelling floor area and number of bedrooms can adjust the requirement.
Under the 2021 edition of Approved Document F (in force since June 2022), replacement windows installed in England and Wales must provide adequate background ventilation in the vast majority of cases — whether or not the original windows had trickle vents. FENSA and CERTASS registered installers are responsible for ensuring compliance before issuing a certificate. A written customer disclaimer opting out of trickle vents is not accepted as valid. Scotland and Northern Ireland apply equivalent requirements through their own building standards frameworks.
A standard trickle vent provides a relatively straight air path from outside to inside, which transmits external noise with minimal resistance. An acoustic variant redirects incoming air through a labyrinth of baffles and sound-absorbing linings that dampen sound waves before they enter the room. Performance is measured using the Dn,e,w rating in decibels — a higher value means better noise reduction. The trade-off is that acoustic baffles reduce effective airflow, so the tested EA of an acoustic vent is typically lower than a standard model of the same length. Manufacturers like Shengxin Aluminium publish both EA and Dn,e,w data on a single datasheet, allowing specifiers to verify compliance with both ventilation and acoustic requirements.
Closing a trickle vent temporarily using its built-in slider is perfectly acceptable — the vent is designed to be controllable. However, permanently sealing or removing a vent that building regulations require defeats its purpose and can lead to condensation, mould growth, and poor indoor air quality. If draught or noise is the concern, the better solution is to check the vent is correctly installed with no gaps around the housing edges, or upgrade to an acoustic-rated surface mounted model that attenuates sound while still delivering the required background airflow.



 un service en ligne
 0086 136 3563 2360
 sales@sxalu.com
 +86 136 3563 2360
 français
 English
 Deutsch
 русский
 español
 português
 العربية
 ไทย
ไทย Việt
Việt Українська